Setting up Aurora in Your Project
Requirements
- Aurora Controls support Xamarin.Forms 3.4.0 and greater.
Add Packages and References
- Right-click your root project's Packages folder and choose Add NuGet Packages...
- You will need to add the appropriate Aurora Controls package to your app depending on your purchase.
AuroraControls.Core
This package contains all of the controls and components available as part of our Standard and Premium offerings.
AuroraControls.Lite
This package contains a small subset of controls that are available as part of our overall Aurora Controls package.
AuroraControls.Experimental
Want to try out some code that is hot out of the oven? Give experimental a shot. The experimental package contains all of the controls and components available as part of our Standard and Premium offerings and additional controls that we are currently working on.
Obtaining a License Key
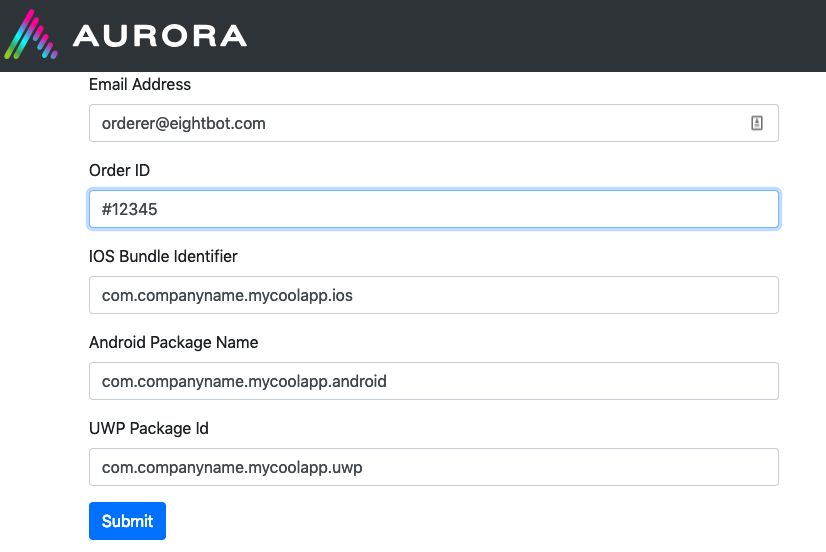
- Upon completing your license purchase from the Aurora Controls store, you will receive an email with an ORDER ID.
- Using this order id, go to our Key Generation Site to register your products.
- The site will need a few pieces of information.
First, you will need to provide the same email address and order id that you used to place your order.
Next, you will need to provide the identifiers of your application. These are typically shown in reverse domain name order. So, for example your app identifier could be app.auroracontrols.mycoolapp.
Please note that your app identifiers may vary between different platforms and you will need different serial keys for each supported platform.
This information can be found from the following spots in your app.
iOS
In your iOS project, open up the Info.plist file. You will need the bundle identifier.

Android
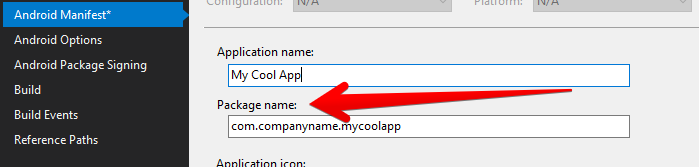
In your Android project, open up the AndroidManifest.xml file or open the project's properties and go to the Android Manifest tab. You will need the Package Name.
UWP
In your UWP project, open up the Package.appxmanifest file and go to the Packaging tab. You will need the Package Name.

- Enter in your email address, order id, and any of the package ids that you have for your apps. If you are not supporting one of the platforms, you can omit filling in that value.
This is a one-time process, so please ensure that the information that you provide is correct.
- Your license keys are now ready!
Setting up iOS
- In your iOS project, open up the AppDelegate
- In FinishedLaunching add the following init code after global::Xamarin.Forms.Forms.Init();:
Aurora.ComponentLoader.Init("{Enter your product key here}");
Setting up Android
- In your Android project, open MainActivity
- In OnCreate add the following init code after global::Xamarin.Forms.Forms.Init(this, bundle);:
Aurora.ComponentLoader.Init("{Enter your product key here}");
Setting up UWP
- In your UWP project, open App.xaml.cs
- In OnLaunched add the following init code after Xamarin.Forms.Forms.Init(e);:
Aurora.ComponentLoader.Init("{Enter your product key here}");
Adding Appropriate Namespaces
In order to utilize Aurora controls, the necessary namespaces must be added to your Xaml or cs file. For example, if you want to use Aurora Controls add the following:
Xaml
xmlns:aurora="clr-namespace:Aurora.Controls;assembly=Aurora"
C#
using Aurora.Controls;